Saturday, August 11, 2018

Vegetarian Chili with Home Grown Vegetables

I usually think of chili as something that pretty much comes from the pantry. My recipe used to be 1 onion, 1 garlic, 1 pepper, 1 pound ground meat or protein of some sort, 1 can beans, one can chopped tomatoes, 1 Tbs. chili powder. Everything (with the possible exception of the "meat") came out of the pantry. It was very quick and easy, but of course, nothing was home grown.

Here's how I make chili now:

Vegetarian Chili with Home Grown Vegetables

  • 1 Tbs. olive oil
  • 1 medium onion, chopped
  • garlic or 1 elephant garlic, chopped
  • sweet bell pepper, any color, chopped
  • 3 cups dried beans, cooked (I use a mix of whatever is handy. Black beans, chick peas, kidney beans, pinto beans, cow peas, navy beans all work, and it's nice to have a different colors. I cook the beans in the pressure cooker.) If you don't have dried beans on hand, you can use 3 cans of beans instead.
  • 1 cup barley (or rice), cooked (again, I use the pressure cooker to speed things up)
  • a couple of jalapeno peppers, minced
  • 1 1/2 cups corn
  • 1 pound red tomatoes, blended, or 1 15 ounce can crushed tomatoes
  • 2 cups vegetable stock
  • 1 tsp. cumin powder
  • salt and pepper to taste


Heat the olive oil in a large skillet or Dutch oven. Add the onion, garlic, bell peppers, and cumin and cook until the vegetables are soft. If you are very brave, you can add the jalapeno peppers at this point. Otherwise wait until the end, and add them a little bit at a time and taste frequently until you have the chili as spicy as you like.

Add the rest of the ingredients.  Heat to a simmer. Taste, and add salt, pepper, and more jalapenos, if you would like. Let the flavors blend for 20 minutes or throw into the crock pot for a couple of hours on low.

Serve over brown rice, or baked potatoes, if that sounds delicious to you. Garnish with salsa, sour cream, chopped chives, cilantro, grated cheese, or whatever suits your fancy.


Wednesday, August 1, 2018

Cucumber Lemonade

True confessions time.  We have too many cucumbers. I meant to plant a 50 foot row, and I had more seedlings than I intended, so I ended up with a 100' row of cucumbers. I know.  I should have just stuck with the plan, but I couldn't just murder the poor little dears.  Cucumbers are sort of a problem.  They need to be harvested at LEAST every other day. And the plants are prickly, so you have to wear long sleeves, no matter how hot it is. We grow cucumbers, but they are less fun than other crops. And one member of the family doesn't even like them.  But the first thing he said when the first uber-crop came in was, "Are we going to make cucumber lemonade?"

Oh, heck, yeah! Working in the greenhouse in the heat of the summer requires us to have cold beverages available at all times. And yes, we have to have something other than water available.  I may write a blog on why, at  some point.

Cucumber lemonade is delicious, refreshing, and a little unusual. The original recipe called for juicing fresh lemons, which is even more delicious than the way I make it with bottled juice.  But I make this EVERY DAY during cucumber season, so you will have to excuse me if I take a few short cuts. (Also, I doubled the original recipe, because of the quantities that we drink.)

One nice thing about this recipe is that you don't need to peel or seed the cucumber. Let the blender to all the work.

Cucumber Lemonade

2 Cups boiling water
1 Cup cane sugar
1 large or 2 medium cucumbers
6 Tbs lemon juice

  1. Dissolve the sugar in the hot water, and let this cool in a half gallon pitcher or mason jar.
  2. Chop the cucumbers and liquefy them in the blender. You can add water to the blender if you need to.
  3. Strain the cucumbers into the pitcher (or a large measuring cup, if you are using a mason jar). This will leave you with a pile of cucumber pulp (or foam, depending on how enthusiastic your blender is). You can toss the cucumber foam into the compost, but I usually just eat it with a spoon, since it seems a shame to throw all that goodness away. Add the cucumber juice to the sugar water.
  4. Add the lemon juice and stir. 
  5. Fill the pitcher (or mason jar) with water. (The original recipe didn't do this, but it assumed that you were pouring the lemonade over ice, which would dilute it. We mostly drink it straight.
  6. Refrigerate.


Pickled Cucumbers

My mother's grandfather immigrated to the United States from Sweden.  When I was in junior high school, my mother decided to connect with her Swedish roots, and one of the ways she chose to do this was through food.  One of her favorite recipes was Pickled Cucumbers, or Inglada Gukor, as it says in the Swedish cookbooks.

Pickled Cucumbers

1 Cup cane sugar
1 1/2 Cups cider vinegar
1 large or 2 medium cucumber
salt
pepper
fresh minced parsley

  1. Dissolve sugar in cider vinegar. Add a little salt, pepper, and some parsley for color. 
  2. Peel cucumbers. Score the cucumbers lengthwise with a table fork, all the way around. Cut the cucumbers in thin slices. The marks from the fork will make a pretty scalloped shape. 
  3. Put the sliced cucumbers in a 1 quart mason jar (or you can use a casserole dish, but my mother always used a mason jar). At this point I added some thinly sliced red onion to add a little color, but that is not original to the recipe.
  4. Pour the vinegar mixture over the cucumbers. Put the lid on, and refrigerate for 2 or more hours before serving. (Some of the cucumbers will float out of the liquid, so I shake the jar every so often to make sure all the cucumber slices get in the brine.


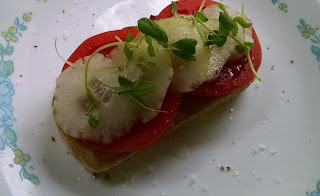
Usually, we just had pickled cucumbers as a refreshing summer side dish. But they are also fun on a sandwich. Here is my new favorite lunch. This is toasted french bread, topped with hummus and sliced tomatoes, sprinkled with sea salt and freshly ground pepper. Add sliced pickled cucumbers, and garnish with microgreens.